


AppleInsider could receive an affiliate fee on purchases created by way of links on our web page.

While it is really really rarely desired, flushing the DNS cache may well assistance clear up mysterious world wide web relationship problems. This is why, when, and how you do it.
This is a single of those guidelines that you may well hardly ever need to have to make use of. That stated, it is a valuable idea to have as component of a Mac user’s troubleshooting arsenal when a Mac is obtaining difficulties connecting to websites, and the common raft of uncomplicated fixes — also recognized as “restart all the points” — are not resolving it. 
This certain tip isn’t that simple if you are unfamiliar with the Terminal app, but will not stress — we will information you by means of it.
Your Mac, your router, and your World-wide-web Company Company all have DNS caches in services to obtaining you related to your most-frequented internet sites at any time more quickly, so let’s get started there.
What a DNS cache does

You might previously be informed that just about every internet site or other place on the net in fact has a numerical address relatively than the identify you imagine of: for example, you would enter “apple.com” into a browser, but the precise IPv4 handle is 17.253.144.10. People aren’t particularly superior at memorizing strings of figures as opposed to text, so the Area Identify Program (DNS) was produced, turning these addresses into very easily memorable names.
Each ISP employs a cache of regularly-visited site addresses to make a more quickly relationship to the ideal spot on their very own DNS servers, and utilizes this to do a a lot quicker lookup of the serious handle for any internet site, when it receives the ask for from your computer system. For the precise same good reasons, most routers also preserve a tiny cache of often-frequented web site addresses, and so does your personal computer.
If your Mac can fetch the IP tackle of any website extra immediately than ready for the ISP’s DNS server, it will consider you immediately there — bypassing any attainable lookup delays from other DNS servers together your “route” from request to the serving of the website.
This full procedure normally takes mere tenths of seconds on a rapid relationship, but you could nevertheless be equipped to detect that if you return to a site you not too long ago visited, the page normally appears to be to load additional quickly than if you stop by a site you’ve by no means been to before.
That is mainly because if the “lookup” — the conversion from name to IP figures — for the under no circumstances-frequented is not by now cached on your computer system, the browser falls back to the ISP’s DNS server to come across the genuine tackle, which usually takes a moment extended — most likely a couple of seconds extra if you are 1 of the pretty handful of to go to that web page.
Internet connection challenges

Relationship difficulties can occur when the ISP’s DNS server is owning its own challenges — which would affect all the Wi-Fi-related products in your domestic — or when your router’s DNS cache has become corrupted, or if your individual computer’s DNS cache has issues. This can be triggered by basic problems composing to the cache, or in incredibly uncommon instances by means of malware.
If you might be possessing difficulty receiving to sites on any of your devices employing your Wi-Fi connection, the 1st point to try is the effortless things — restart the router, restart the affected devices, and see if the link difficulty clears up. Alternatively, you can:
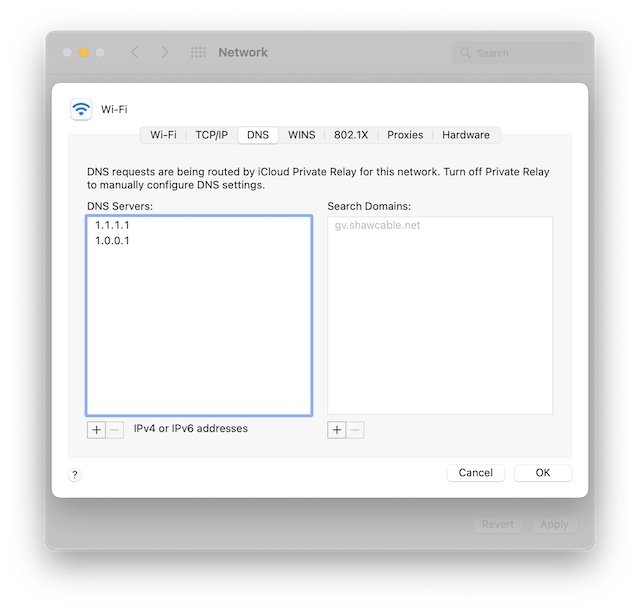
- Turn off Private Relay,if it is turned on
- Go to Program Choices -> Network -> Innovative
- Click on the DNS item in the tabs. Make take note of what the numbers are 1st, just in situation a little something goes wrong.
- Insert Cloudflare’s 1.1.1.1 and 1…1 DNS server alternatively
- Click Ok


Transforming your computer’s distant DNS server of choice can also deal with connection concerns.
If likely to websites abruptly is effective right after that, the problem was with your ISP’s DNS server, and will possible be fixed in a couple hrs. You can restore the ISP’s servers later by just deleting the 1.1.1.1 tackle later, and restarting.
If that didn’t do the trick — and specially if you find that you can not access your frequently-visited sites but random hardly ever-visited web sites truly do go by means of — clearing the DNS cache on your machine could possibly be the remedy.
Terminal time

Apple does not present a graphical or easy way to “flush” a DNS cache because of the rarity of you ever needing to do it, and the threat of undertaking some accidental problems to points if the techniques underneath are not followed thoroughly — as with just about anything involving Terminal. The method is not complicated, and employing copy/paste for the command will assist make certain no errors are built, but if following reading ahead you you should not experience it is something you want to do — or if you are functioning an aged, unsupported version of macOS prior to El Captain it would be greatest to get hold of a area professional to assist.
- Stop, will not just lower, your open purposes.
- You ought to then see a “Go” menu in the menubar at the top of the screen. The past alternative in the Go menu will be the Utilities folder. Decide on that.
- A window will open up with the contents of that folder. Just one of them is named “Terminal.”
- Double-simply click that to open up it
- You must now see a window with some simple textual content in it, ending with your short username and a cursor.
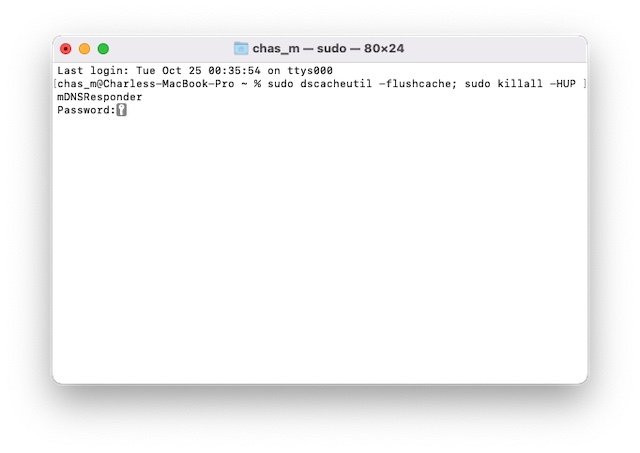
- For the reason that commands in the Terminal will have to be typed making use of an exact syntax, it is most effective to copy and paste the subsequent command fairly than endeavor to form it in oneself:

sudo dscacheutil -flushcache sudo killall -HUP mDNSResponder


 - At the time that is pasted in, push Enter/Return
- You will be requested for your Mac’s login password. Despite the fact that you will be typing it in, the Terminal does not show it at all — so go bit by bit, and be certain you are spelling the password accurately.
- Then press Return or Enter yet again.


Soon after getting into your password, the existing DNS cache will be quickly eradicated.
If you do not get a different password request once more or an mistake message, you will have correctly executed the command. Near the terminal window, and attempt employing your most well-liked browser to take a look at a internet site.
It could load a bit slower than it did right before, but if it masses properly, flushing the DNS cache solved the problem, and your Mac’s DNS cache will rebuild by itself over time. Pat on your own on the again.
More Stories
SEO Services in Digital Marketing
Best SEO Company Helps Bringing More Potential Traffic
How Could I See Profitable Growth Of Business With SEO Services?